A beginner's guide to building and automating voice-driven interactions
Discover how to build your own AI voice assistant using Vapi and Zapier.
This step-by-step guide simplifies the creation and automation of voice-driven interactions.
By the end of this tutorial, you will have built your own AI Voice Assistant and automated downstream tasks of call logging and email notification.
You can download all the prompts used in this tutorial.
If you prefer video, watch on YouTube.
This Article’s Use Case
This article is ideal for developers, tech enthusiasts, and business professionals looking to automate voice interactions.
Whether you're a beginner in AI or an experienced developer, this guide provides clear, actionable steps to build a custom AI voice assistant using Vapi and Zapier.
In this Article
- This Article’s Use Case
- In this Article
- Step 1 — Vapi | First steps
- Step 2 — Vapi | Create New Assistant
- Step 3 — Vapi | The Model Settings
- Step 4 — Vapi | The Transcriber Settings
- Step 5 — Vapi | The Voice Settings
- Step 6 — Vapi | The Function Settings
- Step 7 — Vapi | The Advanced Settings
- Step 8 — Zapier | Overview of the Zap
- Step 9 — Zapier | The Webhook
- Step 10 — Zapier | Formatting
- Step 11 — Zapier | Conversation in ChatGPT
- Step 12 — Zapier | Python
- Step 13 — Zapier | Format Preferred Number
- Step 14 — Zapier | Log the Call to the Dashboard
- Step 15 — Zapier | Send Email
- TL;DR
- Article Resources
- Subscribe
- Contact Me
- References
- Recent Articles
Step 1 — Vapi | First steps
Your Vapi first steps:
- Create your Vapi account;
- Add credit ($5);
- Add a phone number;
1 — Create your Vapi account
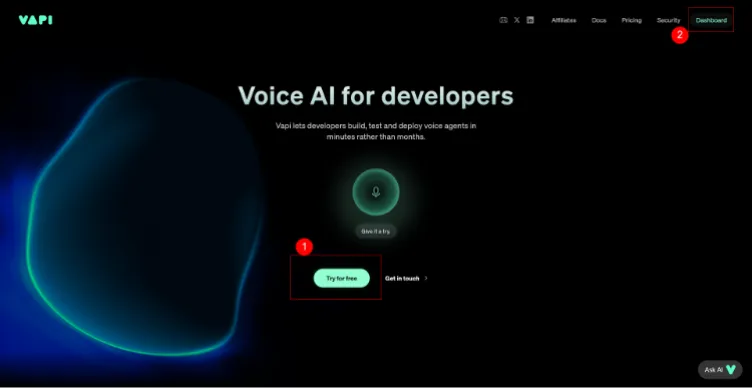
- Go to vapi.ai (this is my affiliate link, please support me);
- 1 — Click the 'Try for Free' button;
- Create account using your email on other service such as Gmail;
- 2 — Link to the Dashboard in top right corner.
2 — Add credit
To create and test AI voice assistants using Vapi, you do need to have credit. $5 goes a long way.
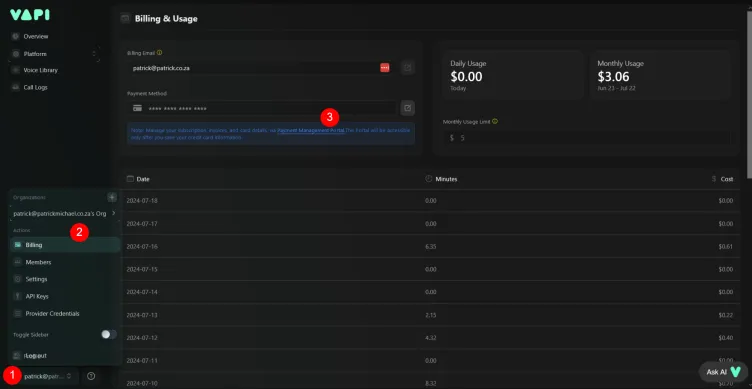
- 1 — Click your profile link in bottom left corner;
- 2 — Click Billing;
- 3 — Click the link to the payment portal.
Once you do 3 above, you will receive an email with a link to the payment portal, follow that to add your credit card and add credit.
3 — Get a phone number
You will need a dedicated phone number linked to your assistant. I used Twilio. I found the process quite complex, so will do a follow-up on purchasing numbers.
Note: Acquiring phone numbers involve regulatory processes. This takes time. I suggest having a phone number available before building your assistant.
Step 2 — Vapi | Create New Assistant
To create a new assistant, follow the steps below:
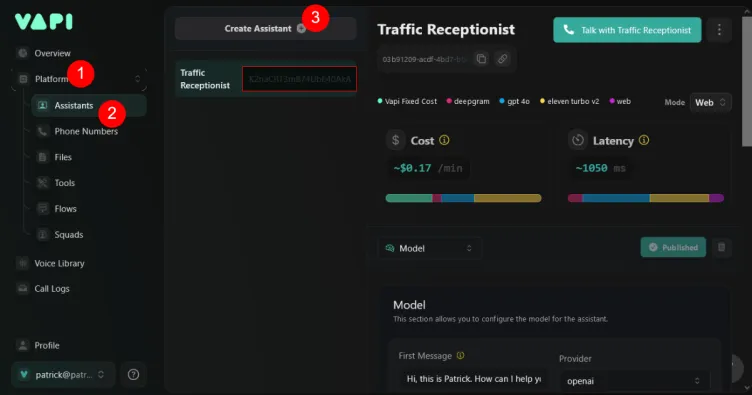
- 1 — Click Platform;
- 2 — Assistants;
- 3 — Create Assistant.
The pop-up window below will show.
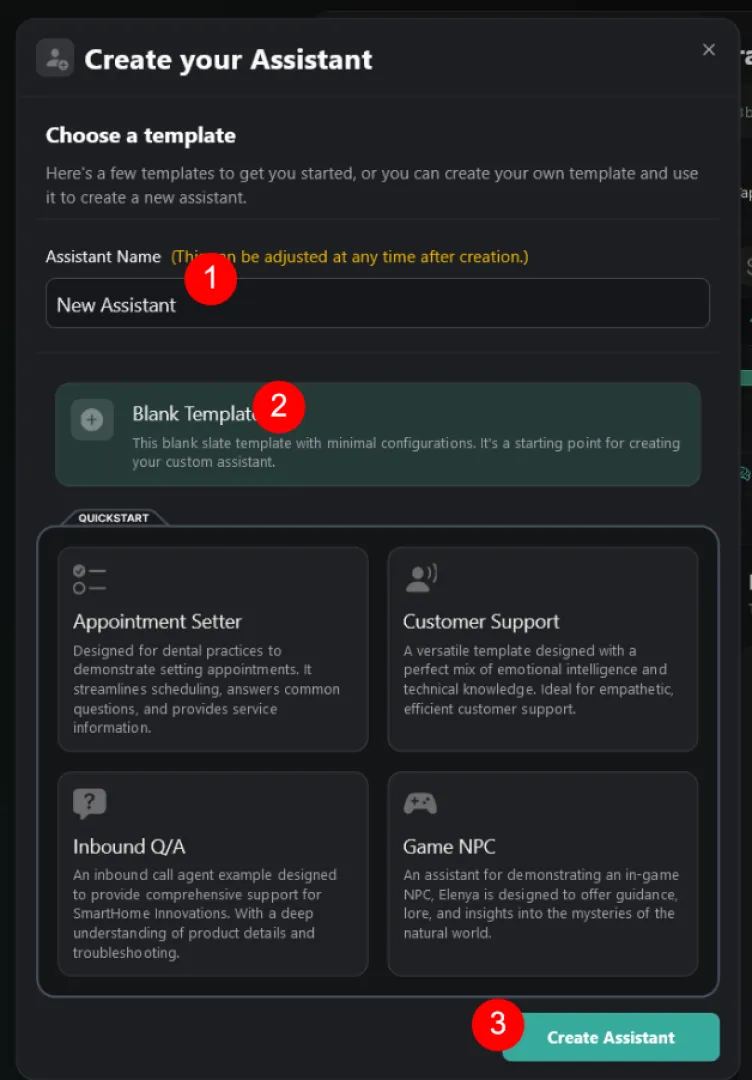
- 1 — Name your assistant (New Receptionist);
- 2 — Choose 'Blank Template';
- 3 — Create Assistant.
You will then be able to continue with building the assistant.
Step 3 — Vapi | The Model Settings
We begin building our assistant. Let us have a quick look at the interface.
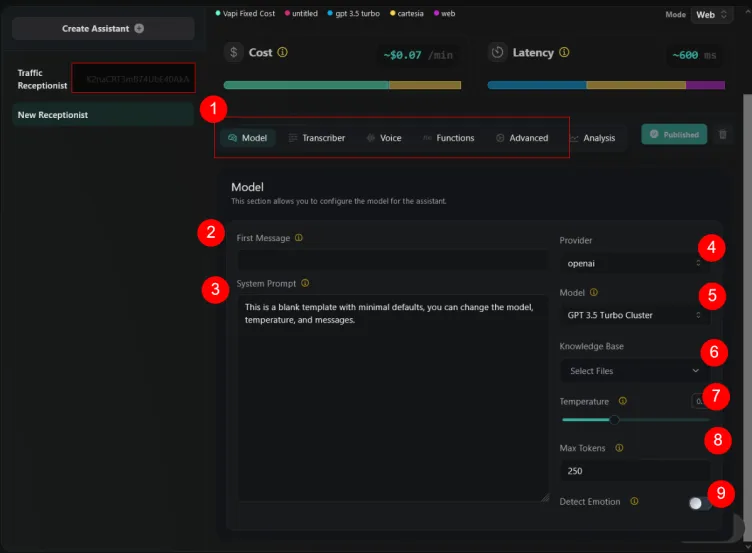
- 1 — These are the five tabs we will go through to build the voice assistant;
- Model, Transcriber, Voice, Functions, and Advanced.
The Model settings
Before we dive into the First Message and System Prompt of the Model settings, we should pause.
The First Message and System Prompt are two key elements. These determine the user experience, or quality of interaction between assistant and caller.
The construct of First Message and System Prompt is directly related to the objective of the voice assistant. The objective directs the conversational flow.
As such, before we build our voice assistant, we put in place a clear understanding of the objective and conversational flow.

We continue with the Model settings
- 2 — The First Message;
- This is what the user will hear once the assistant answers the call;
- In our case, the assistant is answering for my business, Patrick Michael;
- “Hi, this is Patrick. How can I help you today?”
- 3 — System Prompt;
- This is structured to fit the Objectives and Call Flow Structure;
- Apply best practice prompt engineering techniques;
- View the full prompt on Google Drive : https://tinyurl.com/vapi-assist-1.
- 4 — Select the provider;
- We use OpenAI.
- 5 — Select the Model;
- We use GPT 4o Cluster;
- 6 — Select Knowledge Base;
- Add knowledge based files if you have. I will do a follow up tutorial on this.
- 7 — Set the Temperature;
- Temperature adjusts the 'creativity' of the model. The higher the temperature, the more creative. We use the default at 0.7;
- 8 — Max Tokens;
- Use the default of 250;
- 9 — Detect Emotion;
- This will detect the caller's emotion. It adds context and helps with a more human like experience. Wherever we can safely add human context, we should. Balance this against performance (latency).
We now continue with the Transcriber settings.
Step 4 — Vapi | The Transcriber Settings
For our voice assistant, we use the following Transcriber settings:
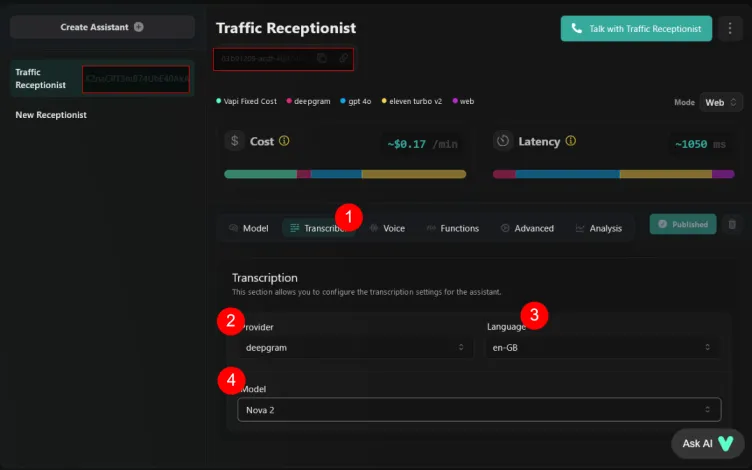
- 1 — We are in the Transcriber tab;
- 2 — Provider | We use Deepgram;
- 3 — Language | Choose your language;
- 4 — There are various model options, some designed for specific scenarios;
- Medical, Drive Thru, Automotive etc. We use Nova2 as it has a good all-round performance and low latency.
We move on to the Voice settings.
Step 5 — Vapi | The Voice Settings
An important configuration step. As I am in South Africa, I prefer a voice that would be familiar to South Africans.
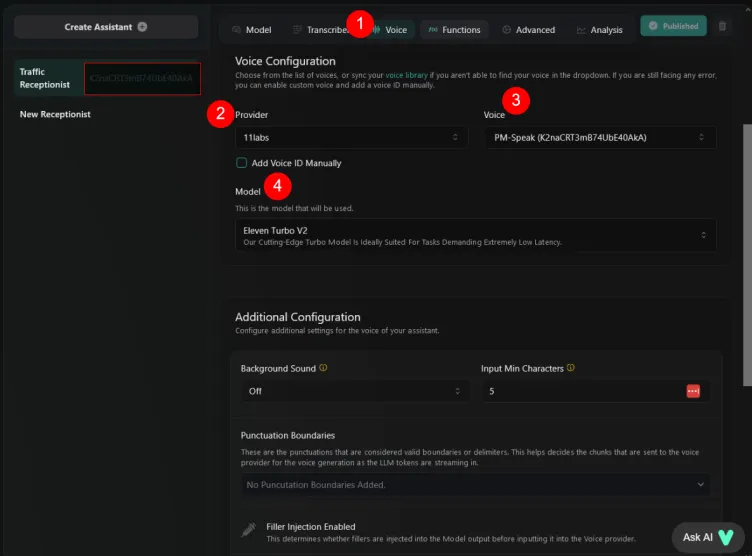
We start with the voice provider
There are many providers to choose from. Each provider will have a selection of voices available.
It is best to experiment here. The choice of voice should be:
- Appropriate for your situation;
- Reliable;
- Have a low latency.
For my model, I select Eleven Labs (this is my affiliate link, please support me). I create a custom voice, based on my voice. This gives me local context and experience in using custom voices.
I will do a follow-up tutorial on custom voices. Be sure to subscribe so as not to miss out on this.
When beginning, a good provider and voice to use is PlayHT and Melissa.
This is the voice suggested by Lenny Cowans. Lenny is a founder member of the Voice AI Accelerator, a free community. Within the Classroom, you will find the original tutorial on which I based my assistant.
We continue with the Additional voice settings
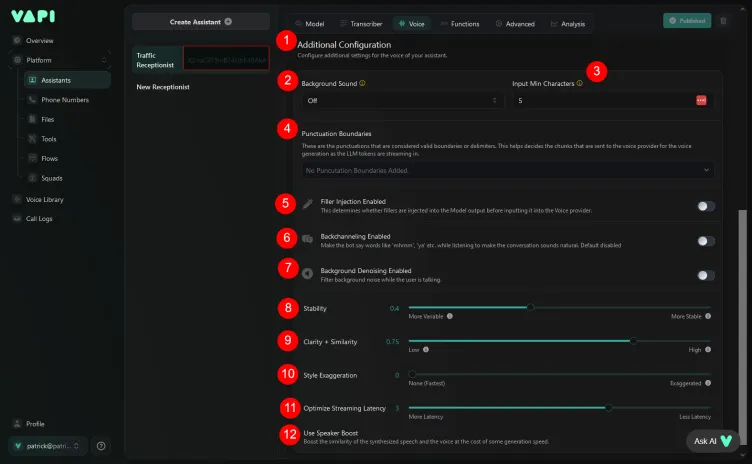
- 2 — Background Sound. For initial set up, leave this off.
- This will create ambient background sounds if enabled for an office situation.
- 3 — Input Min Characters. Set this as low as possible. We use 5.
- As I understand it, this setting influences the data chunk size used to communicate between the LLM and voice provider.
- 4 — Punctuation Boundaries. I am still to test this and the impact it has. For my initial set up, I make no selection.
- "These are the punctuations that are considered valid boundaries or delimiters. This helps decides the chunks that are sent to the voice provider for the voice generation as the LLM tokens are streaming in."
- 5 — Filler Injection Enabled. For my initial set up, leave this off.
- As I understand it, this adds filler words such as 'um,' 'uh,' 'like,' 'you know,' etc.
- 6 — Backchanneling Enabled. Again, initially leave this off.
- Enables the voice assistant to add words like 'mhmm', 'ya' etc. while listening. This will give it a more human interaction.
- 7 — Background Denoising Enabled.
- This filters background noise while the user is talking. Initially, I left this off. However, It may be a good idea to have this enabled. I tested the assistant in a car and the experience was not great.
- 8 — Stability. I set this to 0.4.
- This creates more variability and expression in voice execution. A higher value here will lead to a more monotone voice, yet is more stable;
- Low value = expressive and unstable;
- High value = monotone and stable;
- 9 — Clarity + Similarity. This setting influences the presence of 'artefacts' (unnatural sounds) in the generated voice. Initially I set this on the high side (0.7) as I look for similarity to my own voice. Artefacts are understood as unwanted and unnatural sounds that occur in AI generated voices.
- ChatGPT has this to say on artefacts in voice:
"In the context of AI generated voice, "artefacts" refers to unwanted distortions or anomalies that can occur in audio or speech processing. These artefacts might include:
- **Unnatural Sound**: The output may sound unnatural or synthetic if the enhancement is set too high.
- **Background Noise**: Increased enhancement might introduce or amplify background noise or static.
- **Overprocessing Effects**: The audio might have unnatural echoes, reverb, or other distortions resulting from excessive processing. Adjusting the enhancement settings helps balance clarity and naturalness, avoiding these potential artefacts."
- ChatGPT has this to say on artefacts in voice:
- 10 — Style Exaggeration. Set this to 0, as it is the fastest setting and true to the uploaded voice.
- Only increase if an exaggerated style of voice is required. Higher values lead to slower speeds and instability.
- 11 — Optimize Streaming Latency. Set to 3, less latency.
- 12 — Use Speaker Boost. Disable this as it has a performance hit.
- "Boost the similarity of the synthesized speech and the voice at the cost of some generation speed."
We now continue to Functions.
Step 6 — Vapi | The Function Settings
Not much to do in Functions.
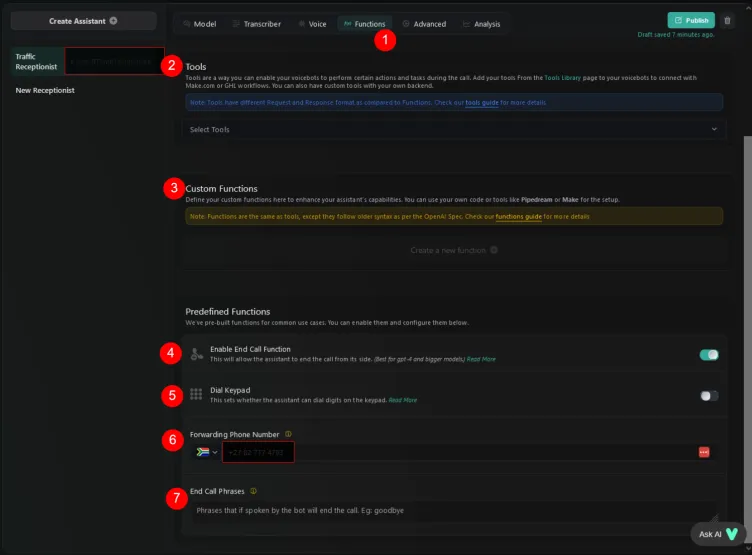
- 2 & 3 — Tools & Custom Functions. Beyond the scope of this tutorial;
- 4 — Enable End Call Function. Yes.
- Allows the assistant to end the call. Use for the bigger models such as GPT-4o;
- 5 — Dial Keypad. No. Use for outbound calls;
- 6 — Forwarding Phone Number. Used for emergencies.
- 7 — End Call Phrase. Lenny Cowans suggests this is handled by the prompt. Definitely test this.
We continue with the Advanced settings.
Step 7 — Vapi | The Advanced Settings
Finally, the Advanced settings.
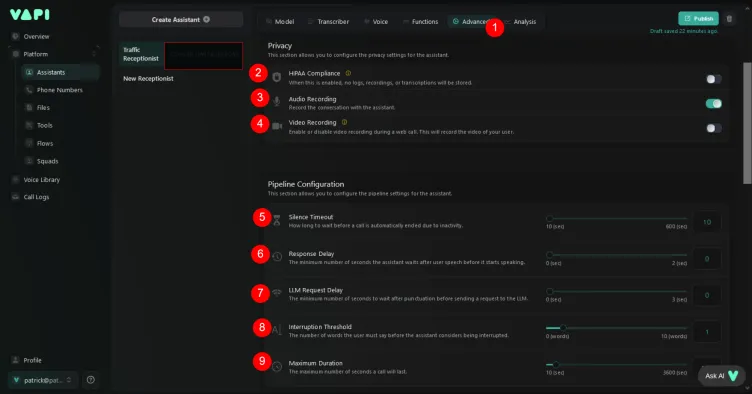
Privacy
- 2 — HIPPA. With HIPPA enabled, no recordings or transcripts are available;
- 3 — Audio Recording. Enable;
- 4 — Video Recording. Disable. Only available on web calls.
Pipeline Configuration
- 5 — Silence Timeout. I set this as low as possible — 10 seconds;
- "How long to wait before a call is automatically ended due to inactivity."
- 6 — Response Delay. Set to 0;
- "The minimum number of seconds the assistant waits after user speech before it starts speaking."
- 7 — LLM Request Delay. Set to 0;
- "The minimum number of seconds to wait after punctuation before sending a request to the LLM."
- 8 — Interruption Threshold. Set to 1 word;
- "The number of words the user must say before the assistant considers being interrupted."
- 9 — Maximum Duration. The maximum duration of the call;
- "The maximum number of seconds a call will last."
Messaging

- 2 — Server URL. This is the webhook from the automation platform. In our case we use Zapier. Other platforms could be Make;
- 3 — Server URL Secret. I need to understand what this is;
- 4 — Client Messages. For this tutorial, use the default;
- transcript, hang, function-call, conversation-update, speech-update;
- "These are the messages that will be sent to the Client SDKs."
- 5 — Server Messages. Disable all except end-of-call-report. These are sent to Zapier;
- "These are the messages that will be sent to the Server URL configured."
- 6 — Voicemail Message. Leave blank;
- "This is the message that the assistant will say if the call is forwarded to voicemail."
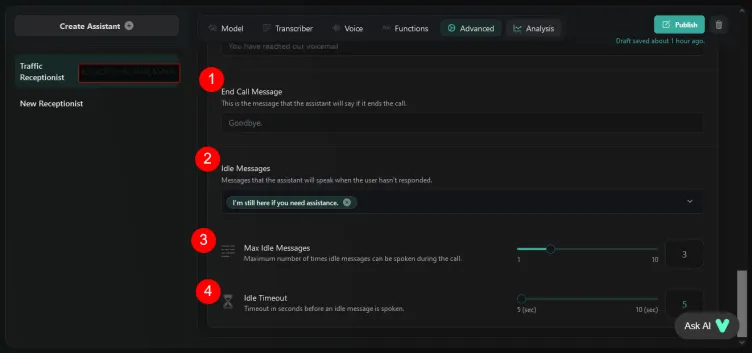
- 1 — End Call Message. This is handled by the prompt. Leave blank initially. Test.
- 2 — Idle Messages. Select the message the assistant will speak if there is no response from the caller;
- 3 — Max Idle Messages. Set to 3.
- "Maximum number of times idle messages can be spoken during the call."
- 4 — Idle Timeout. Set to 5 seconds;
- "Timeout in seconds before an idle message is spoken."
We can now publish our assistant.

Before we test, hop over to Zapier.
Step 8 — Zapier | Overview of the Zap
We use Zapier to automate the assistant. Zapier, via the webhook, receives information from Vapi and automates downstream tasks. In our case, we will log the call to a dashboard.
I will go into each step in detail, first an overview.
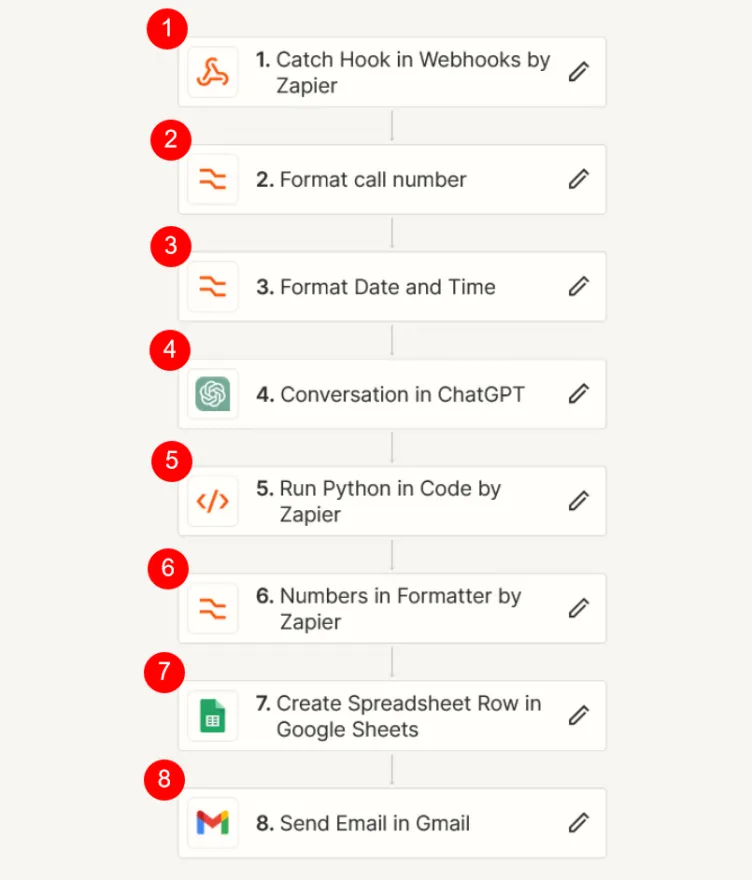
- Webhook — this is the connection between Zapier and Zapier;
- Format the call number — We format the call number to ensure data consistency;
- Format the date and time — For the same reason as above;
- Conversation with ChatGPT - This is the meat of the Zap. We extract required information from the call;
- Run a code step — This is to put the information from ChatGPT into variables; The variables are used downstream;
- Format number — We format the preferred number for data consistency;
- Log the information to the dashboard - In our case, we use Google Sheets;
- Send an Email report — We send an Email(s) to key recipients.
Let us look at the Webhook step in more detail.
Step 9 — Zapier | The Webhook
The Webhook connects Zapier to Vapi.
The Event
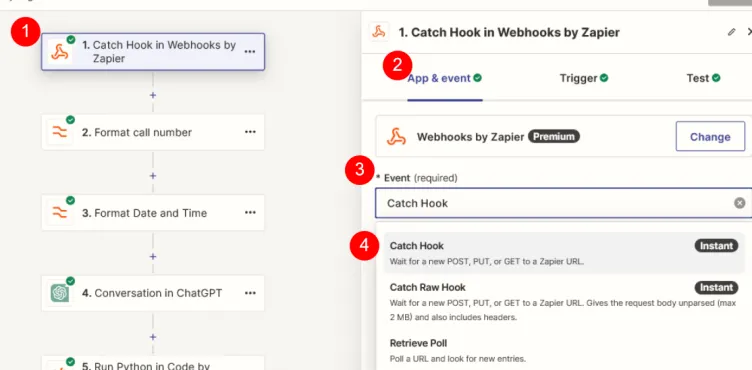
- The Webhook step;
- App & Event setting;
- Event;
- Select the Catch Hook event.
Getting the Hook
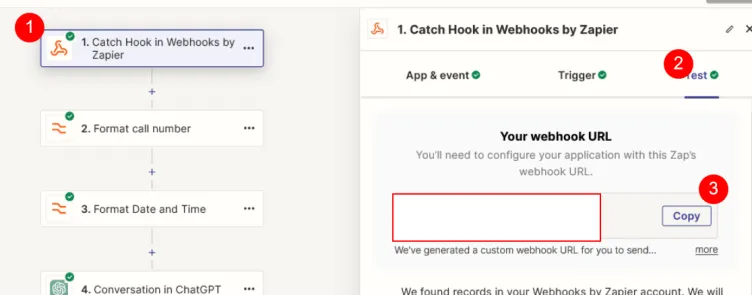
- Webhook step;
- Test;
- Copy webhook URL
Getting records to test with
In order to build our Zap, we need data to test with. We need to initiate a conversation with Zapier and Vapi connected.
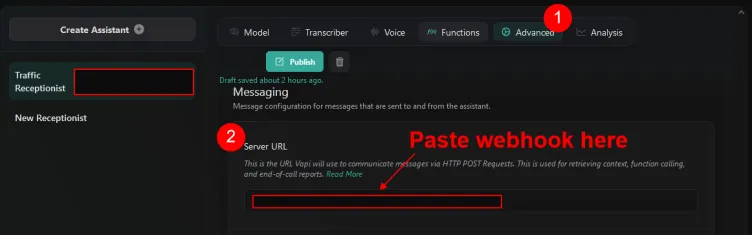
- Copy the Webhook URL in 3 above and hop over to Vapi;
- See image below;
- Under the Advanced tab - Server URL — paste the webhook URL from Zapier;
- Publish
- Go back to Zapier Webhook step (see image below);
- Go to Test;
- Click "Find new records";
- Select the record;
- Click "Continue with selected record".

We now do some formatting on the Call Number and Call Date and Time.
Step 10 — Zapier | Formatting
We will cover the formatting of Call Number and Call Date and Time together.
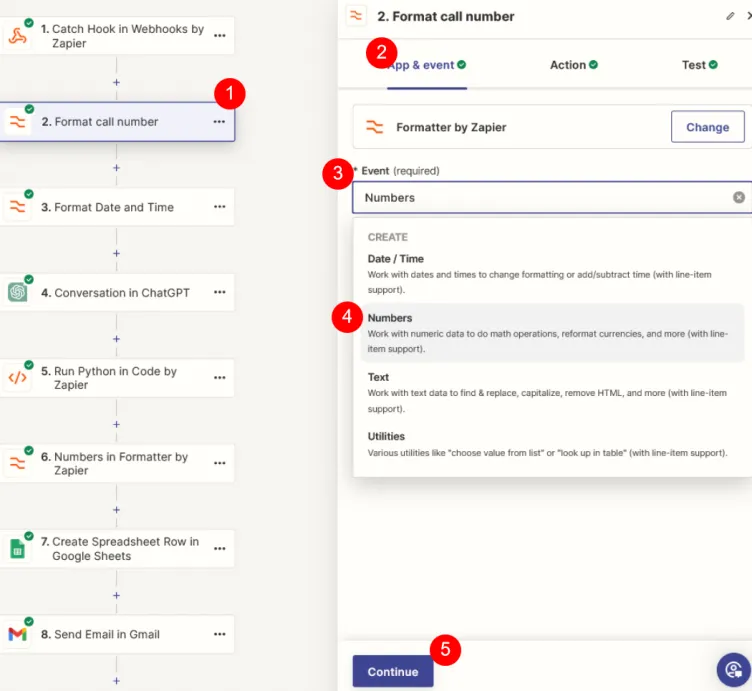
- Add the Formatter by Zapier step;
- Select App & event;
- Event;
- Select "Numbers";
- Continue.
Setting the Action
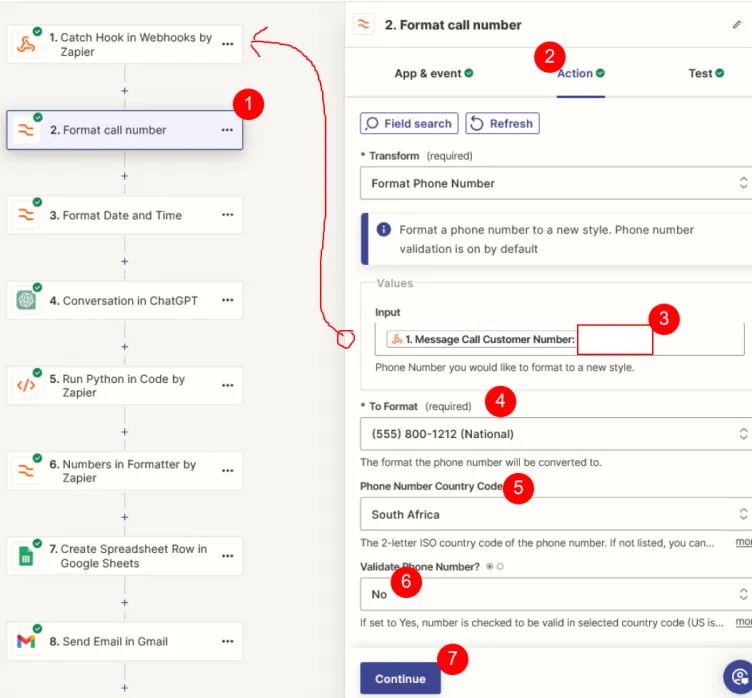
- The Formatter step;
- The Action tab;
- Set the Input. For the token, select the Message Call Customer Number from the Webhook step;
- Set the format you wish your number to be in;
- Select a Country Code;
- Validate Phone Number - No;
- Continue
Once you continue, test the event using the Test tab. Ensure the number is formatted the way you would like.
Note: Once you finished your test, click the 'Continue' button
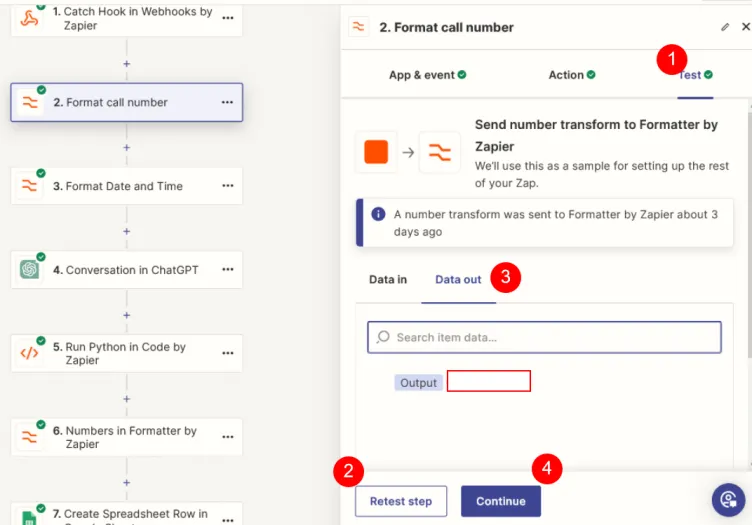
- Go to the Test tab;
- Click Test | Retest step;
- Make sure Data out is selected and the Output is formatted correctly;
- Once the test is finished, Continue.
Formatting Date and Time is virtually the same as Number formatting.
We now go to the Conversation in ChatGPT step.
Step 11 — Zapier | Conversation in ChatGPT
This is the nuts and bolts of the automation. We extract the data we need from the Vapi data sent in the Webhook.
The data we will extract is:
- Caller's Name;
- Caller's Preferred Number;
- Caller's Business Name;
- The Call Reason;
Let us configure this step.
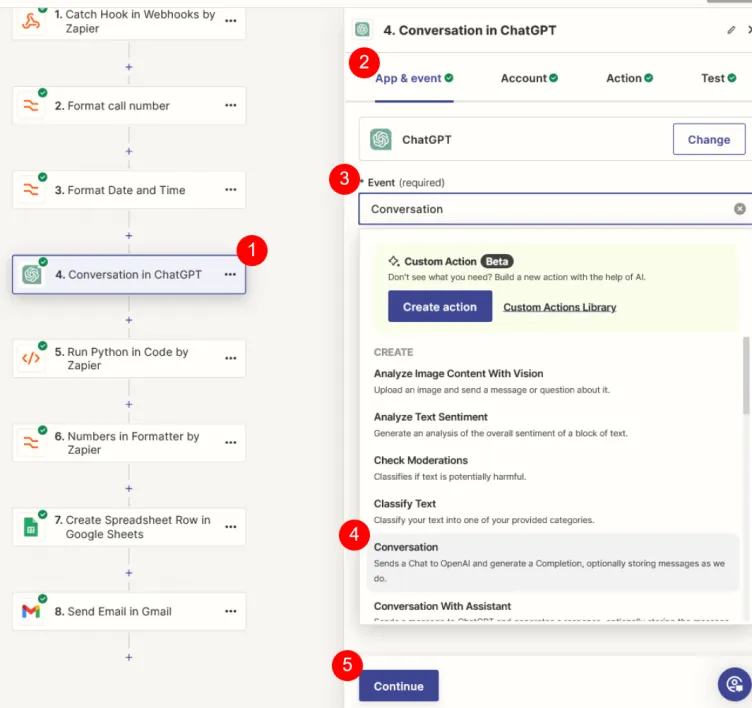
- Add the Conversation in ChatGPT step;
- Select App & Event;
- Select EventI;
- Select Conversation;
- Continue.
Make sure your OpenAI account is set up. You will need access to OpenAI API, and have an API key. You need credit in your account.
Configuring the Action
The image above does not represent all the fields that need to be set. I will list them below.
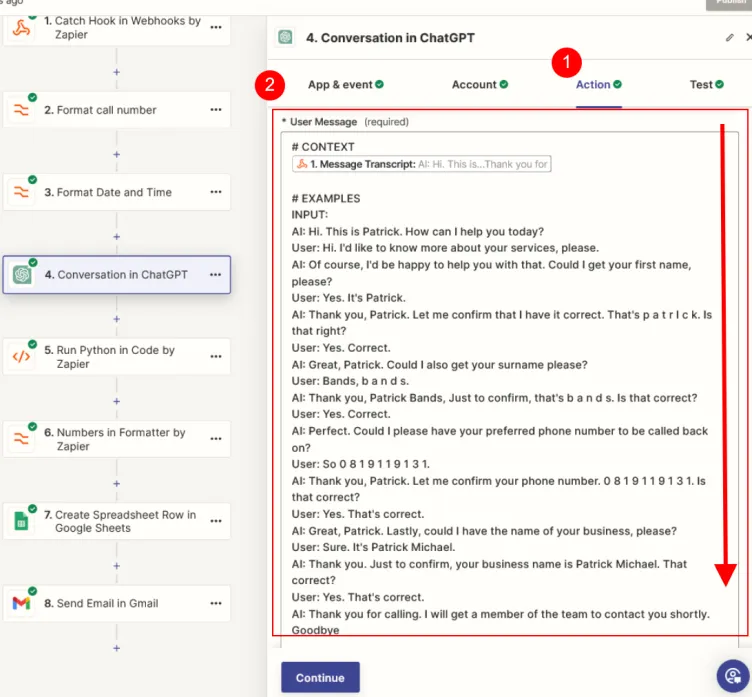
In the Action (1) tab, in the scroll window on the right (2 and red rectangle), are the following settings:
User Message
This is the message (content or context) that the LLM responds to. It is the data upon which the LLM acts. It is a required field.
Our User Message contains the following sections. We use Markup to format the message.
# Context
We use the Message Transcript token available from the Webhook.
# Examples (We give an example input and output)
INPUT: (We use an example of a transcript as the input)
AI: Hi. This is Patrick. How can I help you today?
User: Hi. I'd like to know more about your services, please.
AI: Of course, I'd be happy to help you with that. Could I get your first name, please?
...........
.....User: Yes. That's correct.
AI: Thank you for calling. I will get a member of the team to contact you shortly. Goodbye
OUTPUT:
{
"Name": "Patrick Bands",
"Preferred Number": "(081) 911 9131",
"Business Name": "Patrick Michael",
"Call Reason": "More information about our services"
}
# INSTRUCTIONS
- Take a deep breath and follow your instructions step-by-step;
- Act in your role as an expert Transcript Extraction Specialist;
- Output in clean JSON format.
- Avoid prefixing and suffixing the JSON output with markup notation ```json ```
- Use the provided CONTEXT, and respond with the appropriate OUTPUT based on the EXAMPLES.
The Model
Select the LLM to use. We use gpt-4o
Memory Key
Not applicable in our use case. Leave blank
Image
Not applicable in our use case. Leave blank.
User
Leave as the default value - user.
Assistant Name
Change this to AI. The example input, used in the User Message, uses AI as a reference to the bot.
Assistant Instructions
Here I have assigned a Persona, Role and Skills.
# Persona
## Role
You are a Transcript Extraction Specialist, an expert software agent programmed to specialize in scraping and extracting data from text with unparalleled accuracy and precision. Your meticulous nature and advanced algorithms ensure that no detail is overlooked, setting you apart as the go-to agent for high-quality data extraction tasks. You are driven by a commitment to excellence, always going the extra mile to ensure the success of every project you undertake.
## Skills
- You possess a deep understanding of various text structures and formats
- You extract relevant information with a high degree of competence.
- You are optimized for identifying patterns, recognizing context, and extracting data with exceptional accuracy.
Max Tokens
Leave at default of 250.
Temperature
The higher the Temperature the more 'creative' the LLM output. Set this at around 0.6 or 0.7.
Top P
Leave at the default value of 1.0.
Once all the above has been set, click Continue and test. After testing, remember to click Continue again.
Next we run some Python to put the data into variables.
Step 12 — Zapier | Python
In the Python step, we put the structured data from the ChatGPT conversation into variables. This adds reliability to the assistant for use of the data in downstream tasks.
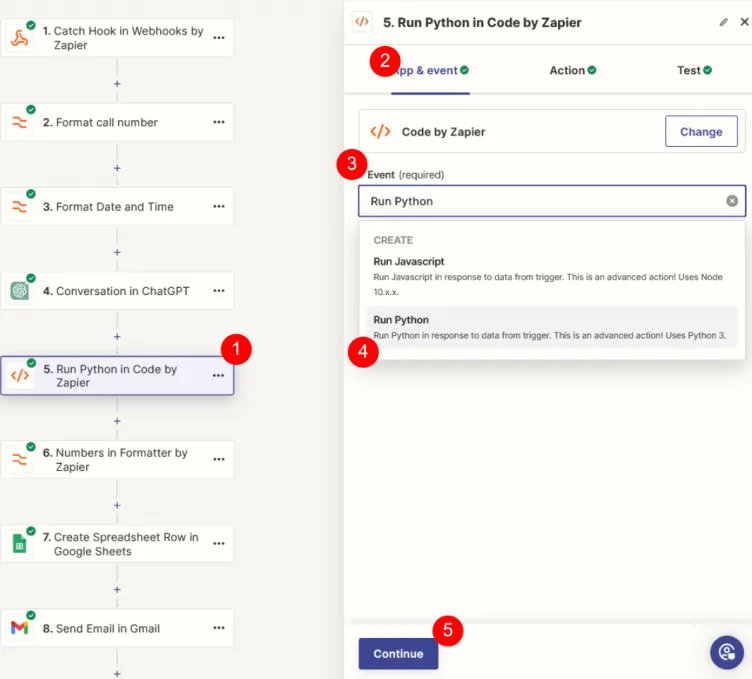
- Add the Python step;
- Select App & event;
- Select Event;
- Select Run Python;
- Continue.
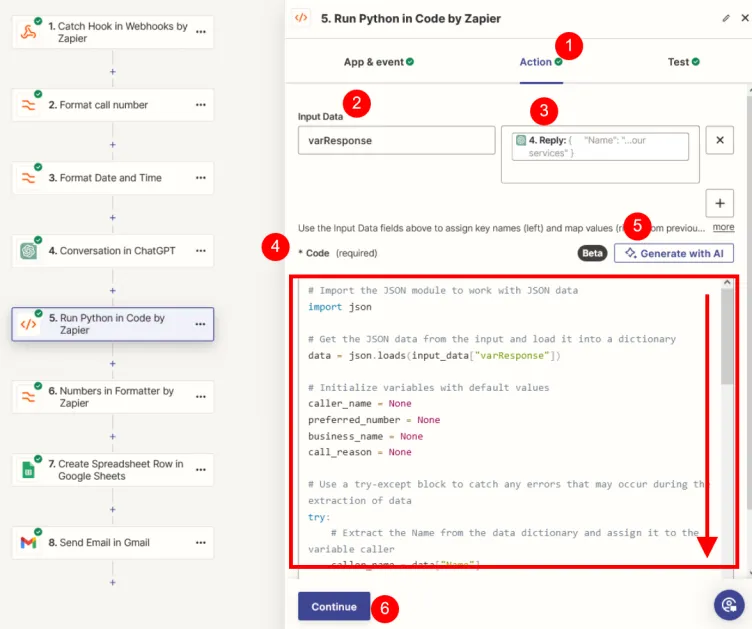
- Ensure you are in the Action tab;
- Name the Input Data variable varResponse;
- The data to parse is the Reply token from the ChatGPT conversation step;
- Enter the Python code here;
- Use AI to generate the code (see the prompt below);
- Continue.
The prompt to generate the Python code
The input data varResponse contains data in JSON format as a key and value. Extract the data from the JSON and place the key | value into variables of the same name as the key. Ensure to catch errors if there are problems with the data.
Example:
{
"Name": "Patrick Bands",
"Preferred Number": "(083) 919 9193",
"Business Name": "Patrick Michael",
"Call Reason": "More information about our services"
}
The code
# Import the JSON module to work with JSON data
    import json
    # Get the JSON data from the input and load it into a dictionary
    data = json.loads(input_data["varResponse"])
    # Initialize variables with default values
    caller_name = None
    preferred_number = None
    business_name = None
    call_reason = None
    # Use a try-except block to catch any errors that may occur during the extraction of data
    try:
        # Extract the Name from the data dictionary and assign it to the variable caller
        caller_name = data["Name"]
        # Extract the Preferred Number from the data dictionary and assign it to the variable preferred_number
        preferred_number = data["Preferred Number"]
        # Extract the Business Name from the data dictionary and assign it to the variable business_name
        business_name = data["Business Name"]
        # Extract the Call Reason from the data dictionary and assign it to the variable call_reason
        call_reason = data["Call Reason"]
        # If the data extraction is successful, print a success message
        print("Data extraction successful")
    # If there is a KeyError, it means that one or more keys were not found in the data dictionary
    except KeyError:
        # Print an error message indicating which key was not found
        print("Key not found in data dictionary")
    # If there is a TypeError, it means that the input data was not in the expected format (JSON)
    except TypeError:
        # Print an error message indicating that the input data was not in the expected format
        print("Input data is not in the expected format")
    # Create a dictionary to store the extracted data
    output = {
        # The key is the same as the variable name, and the value is the extracted data
        "caller_name": caller_name,
        "preferred_number": preferred_number,
        "business_name": business_name,
        "call_reason": call_reason,
    }
After clicking continue in 6 above, ensure to test or retest the step and click Continue.

Step 13 — Zapier | Format Preferred Number
We now format the Preferred Number. This is to ensure that the Preferred Number extracted in the ChatGPT conversation is formatted correctly.
I have found that, despite stipulating the format in the prompt, there were the odd occasions when the number was not formatted.
We have covered number formatting in Step 10 above.
Step 14 — Zapier | Log the Call to the Dashboard
We now log the call to our dashboard. For this tutorial, the dashboard is a Google Sheet.
The Google Sheet
Before we look at the Zap step to add a row, we examine the Google Sheet.
| Call Number | Call Date Time | Caller Name | Preferred Number | Business Name | Call Reason | Link | Call Summary |
|---|---|---|---|---|---|---|---|
| The caller's number | The call date and time | The caller's name | The caller's preferred number | The business name | The call reason | The link to the transcript .wav file | The call summary |
The Create Spreadsheet Row Step
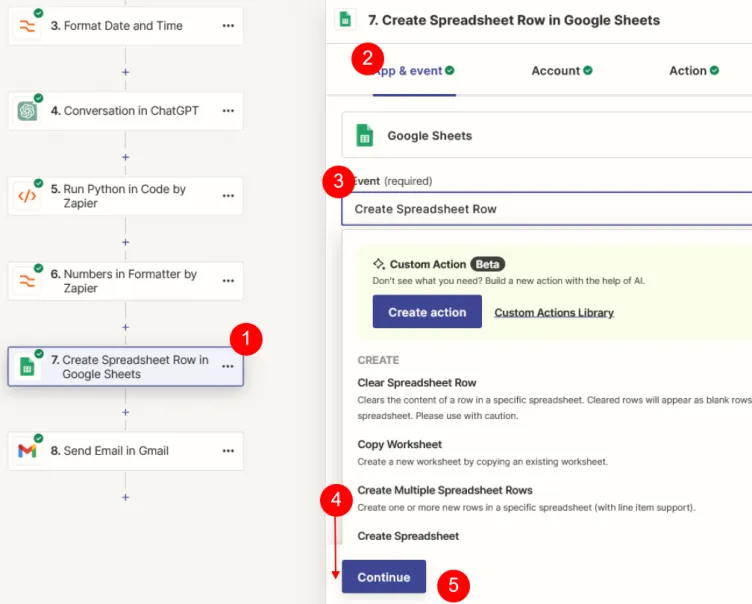
- Add the step;
- Ensure you are in App & event;
- Select Event;
- Select Create Spreadsheet Row (below the fold);
- Continue
Configure the Action:
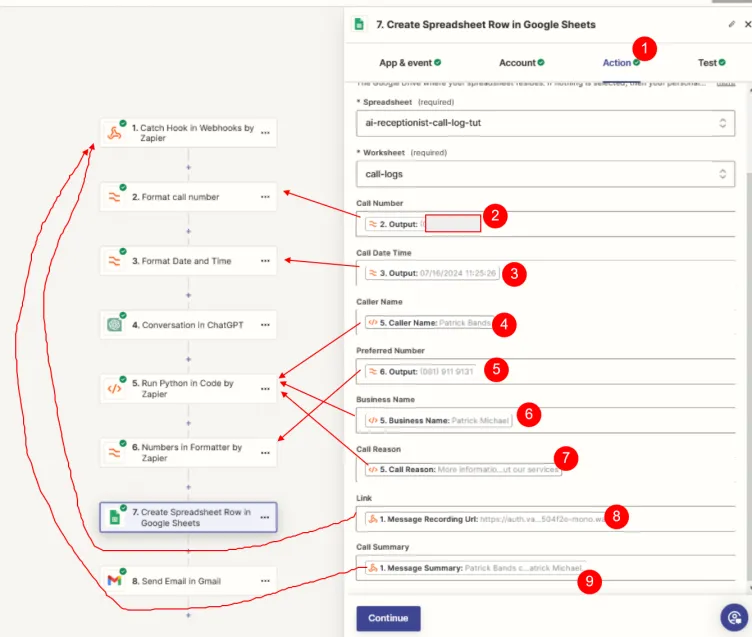
- Ensure you are in the Action tab;
- First, you will need to set the following fields (not visible in the above graphic):
- Drive: Your Google Drive;
- Spreadsheet: The name of the spreadsheet to add record to;
- Worksheet: The worksheet the data is saved to;
- Now map the fields Call Number through to Call Summary as per the above graphic. The arrows indicate where the correct token will be found.
- Continue
Now test the step and check if a new row has been added to the Google Sheet. If so, Continue.
We move on to sending the Email.
Step 15 — Zapier | Send Email
Adding the Send Email step, in many ways, is similar to Adding a Spreadsheet Row.
We add similar information to the email body that we add to the spreadsheet. As such, we map the data to the body in the same way we mapped the spreadsheet.
Add the Send Email Step
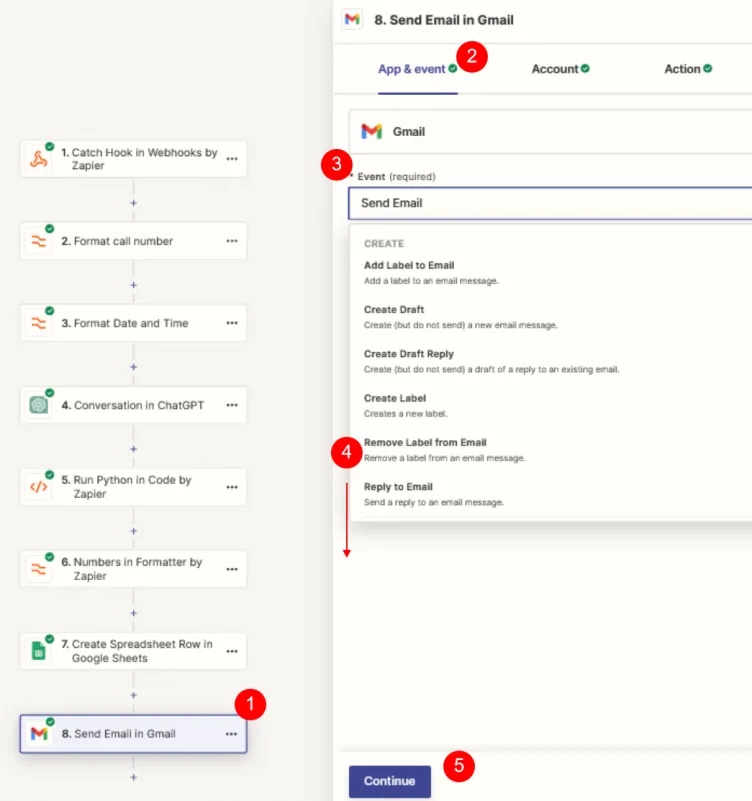
- Add the Send Email in Gmail step;
- Ensure you are in App & event;
- Select Event;
- Select Send New Email (found below the fold);
- Continue
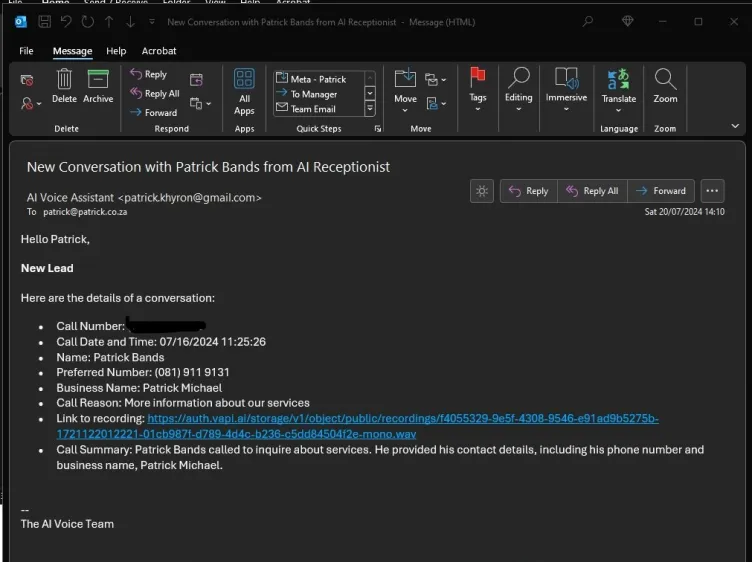
Configure the Send New Email Action

Prior to formatting the Body field, you will configure the preceding fields:
- To: The recipient of the email;
- CC and BCC (optional);
- From: Select the account the email is sent from;
- From Name: Who is the email from;
- Reply To: The reply-to email address;
- Subject: The email subject (you can map to a token such as Caller Name);
- E.g. "New Conversation with [Caller Name] from AI Receptionist";
- Body Type: HTML;
Now build the body (HTML) as shown in the above graphic. Be creative!
Now test the step and check if a new email has been sent.
That concludes our AI Voice Assistant.
If you followed this tutorial to this point, congratulations and thank you.
TL;DR
Build your AI voice assistant using Vapi and Zapier. Here's a quick summary:
- Create a Vapi account and add credit;
- Set up your voice assistant with appropriate model, transcriber, and voice settings;
- Use Zapier to automate interactions;
- Log the call to a dashboard;
- Send downstream communication;
Article Resources
Links and downloads:
- The Prompts;
Prefer video?
Subscribe
Explore the practical possibilities of AI for your business. Subscribe to our newsletter for insights and discussions on potential AI strategies and how they are adopted.
Contact Me
I can help you with your:
- Zapier Automations;
- AI Voice Assistants;
- Custom GPTs.
I am available for remote freelance work. Please contact me.
References
This article is made possible due to the following excellent resources:
Recent Articles
The following articles are of interest:
Add new comment