
Faceted search allows users to narrow their search options and find what they are looking for without guesswork and or too much filtering and browsing. 74% of all web traffic originates from search. Search and performance are KEY to a web site's success. Having search facets available for your users goes a long way to enhancing your user experience.
In this article I walk through my process of setting up search facets on Drupal 8. This article uses the default Drupal 8 database for the search index. For larger sites, it is advised to use a search service such as Apache Solr. This article runs through the process of configuring Apache Solr with Drupal 8.
Enjoy.
The modules needed.
-
Search Api (search_api)
This module provides a framework for easily creating searches on any entity known to Drupal, using any kind of search engine. For site administrators, it is a great alternative to other search solutions, since it already incorporates facetting support and the ability to use the Views module for displaying search results, filters, etc. Also, with the Apache Solr integration, a high-performance search engine is available for this module. -
Facets (facets)
The Facet module allows site builders to easily create and manage faceted search interfaces. In addition to the UI components that come out of the box, themers and module developers can build their own widgets that can optionally be contributed back to Drupal.org. Facets work with Drupal Core Search and Search API, meaning that code and configuration can be reused as-is with the most popular search solutions available to Drupal.
Database search: module provided by Search API This module provides a ready-to-use search backend that indexes and searches content using Drupal's own database. It is mainly meant for testing purposes and for smaller sites, larger sites will usually want to use a more powerful backend (like Solr or Elasticsearch).
Summary of steps
My setup followed the following steps:
- Use Composer to install the modules mentioned above:
composer require drupal/MODULE
- Use:
drush en -y
to enable the following modules:- Search API - search_api
- Database Search - search_api_db
- Facets - facets
- Enable and configure Search Index View mode
- Add a search server
- Add index
- Add and configure fields
- Configure Processors
- Create a 'Search Result' View mode.
- Create a View for the Search Page
- Expose filters for the Search View
- Configure sort criteria for content search
- Add search facets
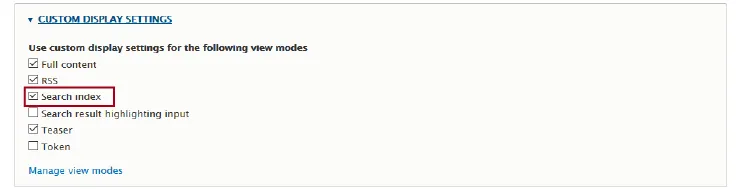
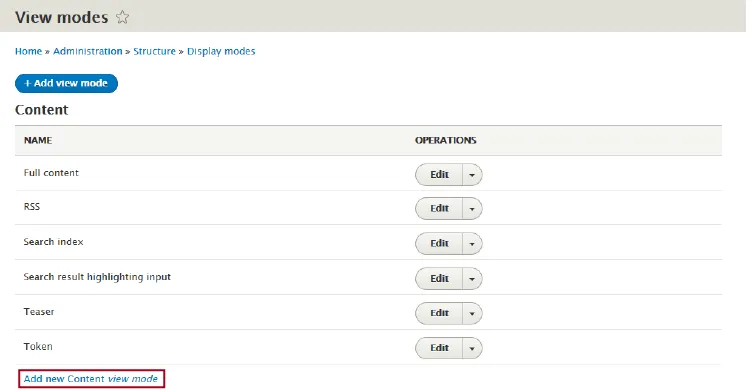
Configure the Search Index View Mode for each Content Type
When we create the Search Index, in part we will select which entities and which fields of those entities to index. We are also able to index the rendered HTML that a user sees, and to select the View Mode of the rendered entity to be used in the indexing process. We do not want to index such things as images, labels and links, this will just muddy the search result.
By default a View Mode called Search Index is created for content types such as Article, Basic Page e.t.c. We will use this View Mode when selecting Rendered HTML as part of the content to index. For this view mode we want long formatted text fields such as Body, Leader or Teaser copy or any field that contains formatted or un-formatted text.
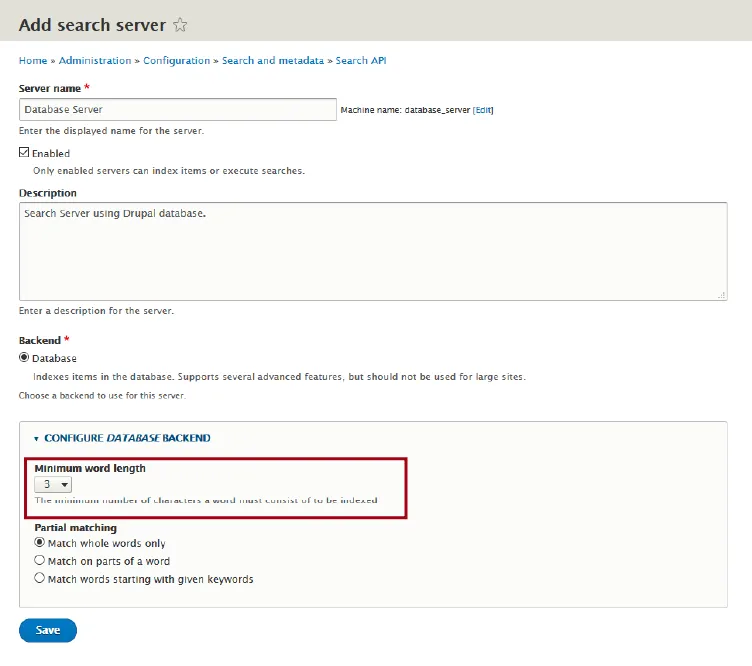
Add a search server
We will now add a Search Server. Navigate to:
    Configuration -> Search and metadata -> Search API
    /admin/config/search/search-api
Click '+Add server' and fill in the form along the lines of the following graphic. Set the minimum word length to 3.
Add a search index
On the Search API screen, click +Add index and fill in and save the form along the lines of the image below. Some notes:
- The Datasources are the entities that contain the content you want to index. In this case we will select the Content entity type.
- Select the Bundles, in this case we will select all.
- In terms of the Server we select the Database Server.
- For Index Options we will keep 'Index items immediately' selected. This is fine for small sites. For larger sites with lots of content and especially in the case of using a dedicated Search such as Apache Solr this setting is moderated against security and performance. Perhaps it is unset and indexing is based on a custom or default Cron process.
- We can leave the rest of the settings as the default setting.
- You can either Save or Save and add fields. In our case click Save .
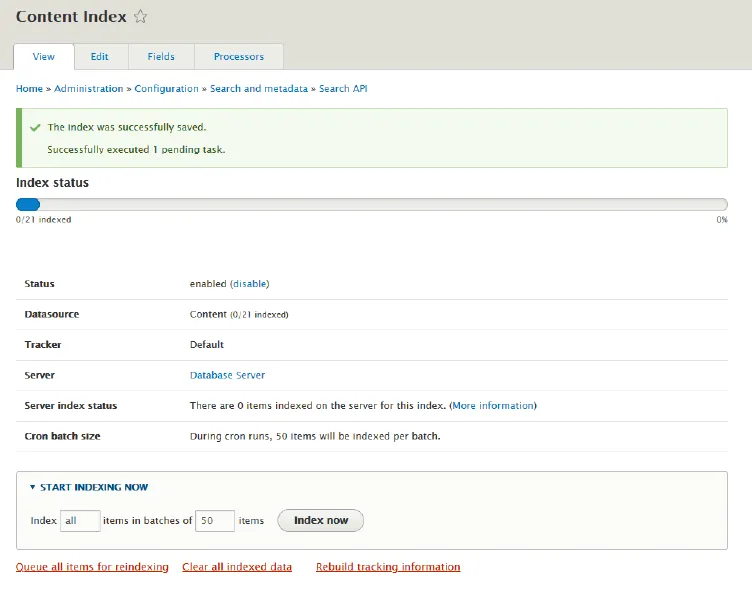
On the save you will see the Content Index configuration and status screens. On the View tab you will see information relating to the status of the index. After the first save, no content is indexed and we can see how many items need to be indexed. The content will be indexed either on the next Cron run or by clicking the Index now button. We will do that now as it helps to illustrate the process to greater detail.
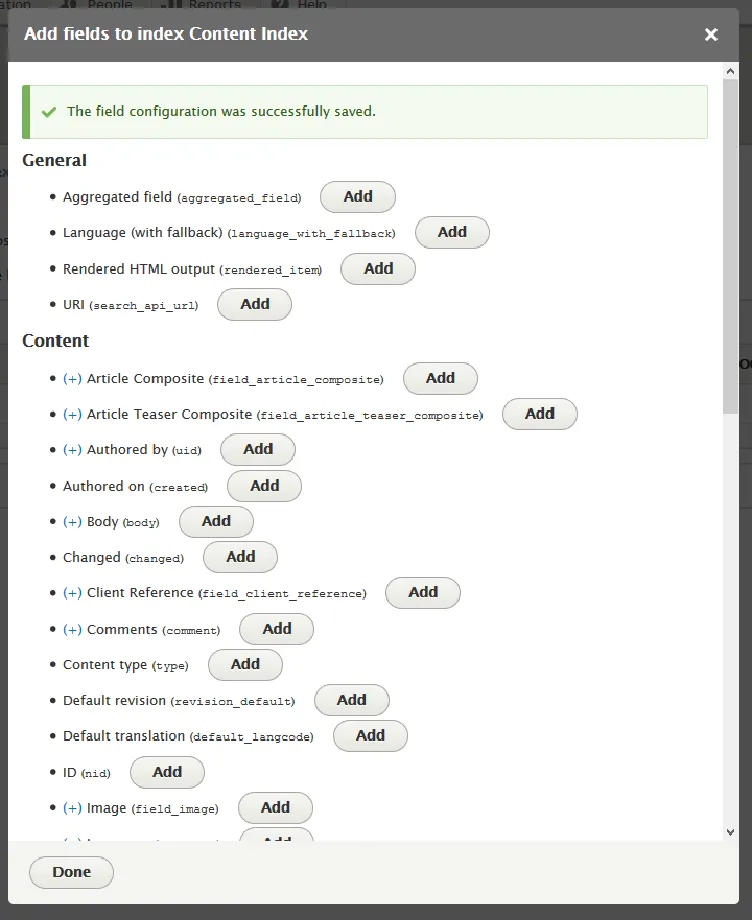
Adding fields
Next we will want to add Fields that exist in the Content entity type to the index. Go to the Fields (Manage Fields for search index Content index) tab and click + Add fields. A modal will pop up with General and
Under
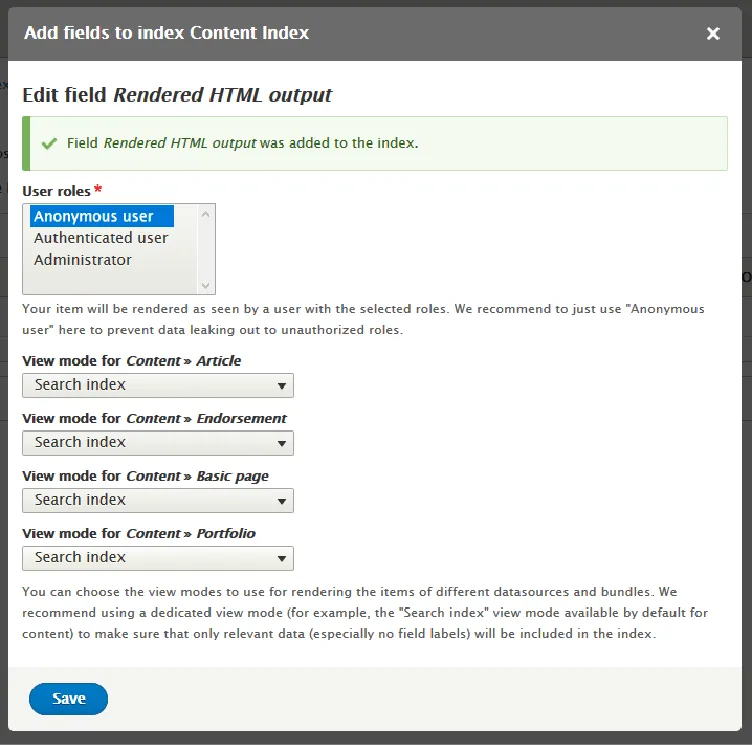
We are then shown the Manage Fields tab with information on the fields we have selected to be indexed.
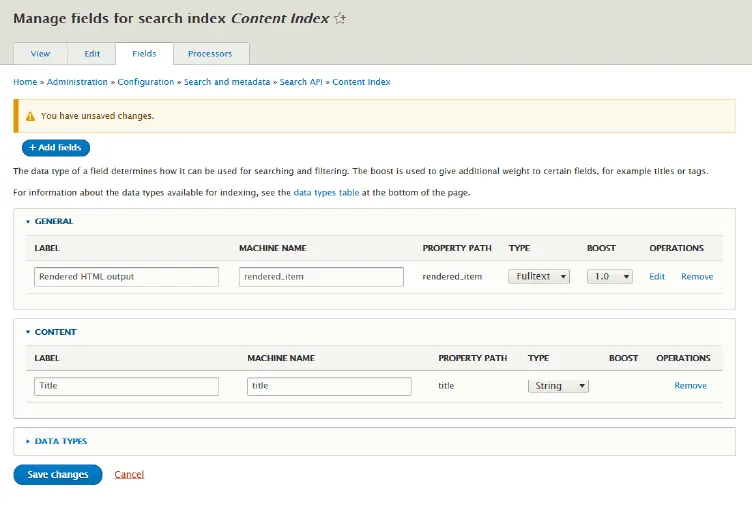
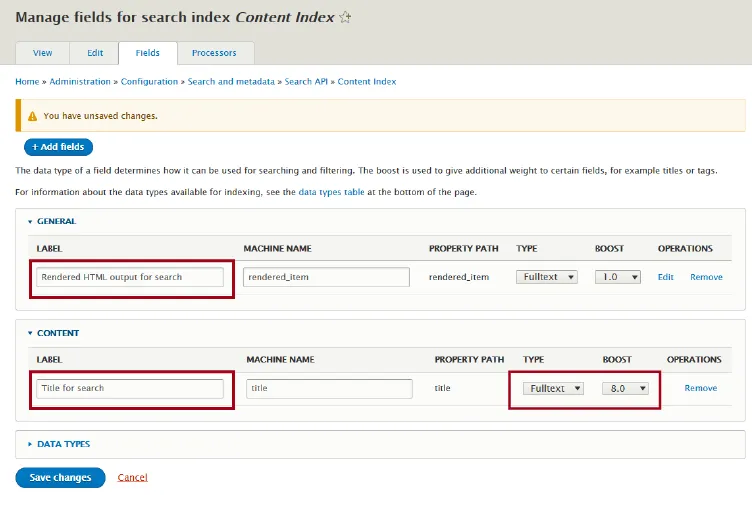
At this point we can point out that we select fields for the purpose of both searching and filtering . Up to now we have only selected fields to search on, one of these being the Title field. We will also use the Title field for filtering thus it is a good idea to differentiate.
Under
What Boost does is to increase or decrease the importance of that field in the search algorithm. We can now save the changes.
We are now shown the message of:
All content was scheduled for re-indexing so the new settings can take effect.
Each time changes of this nature occur, we need to re-index. We will not do that now as we will first select Processors.
Configure Processors
As shown, on the Processors tab, these will:
.. will pre- and post-process data at index and search time.
There are many Processors and some modules may add their own. It is important to NOTE that a dedicated search server such as Solr may have its own Processors that in many instances will conflict with some of those we wil use.
We will select the following Processors:
- Content Access;
- Highlight;
- Under Processor settings we can enable partial word highlighting;
- HTML Filter;
- Under Processor settings one should exclude the Title field from this process;
- Ignore case;
- Stemmer;
- Tokenizer;
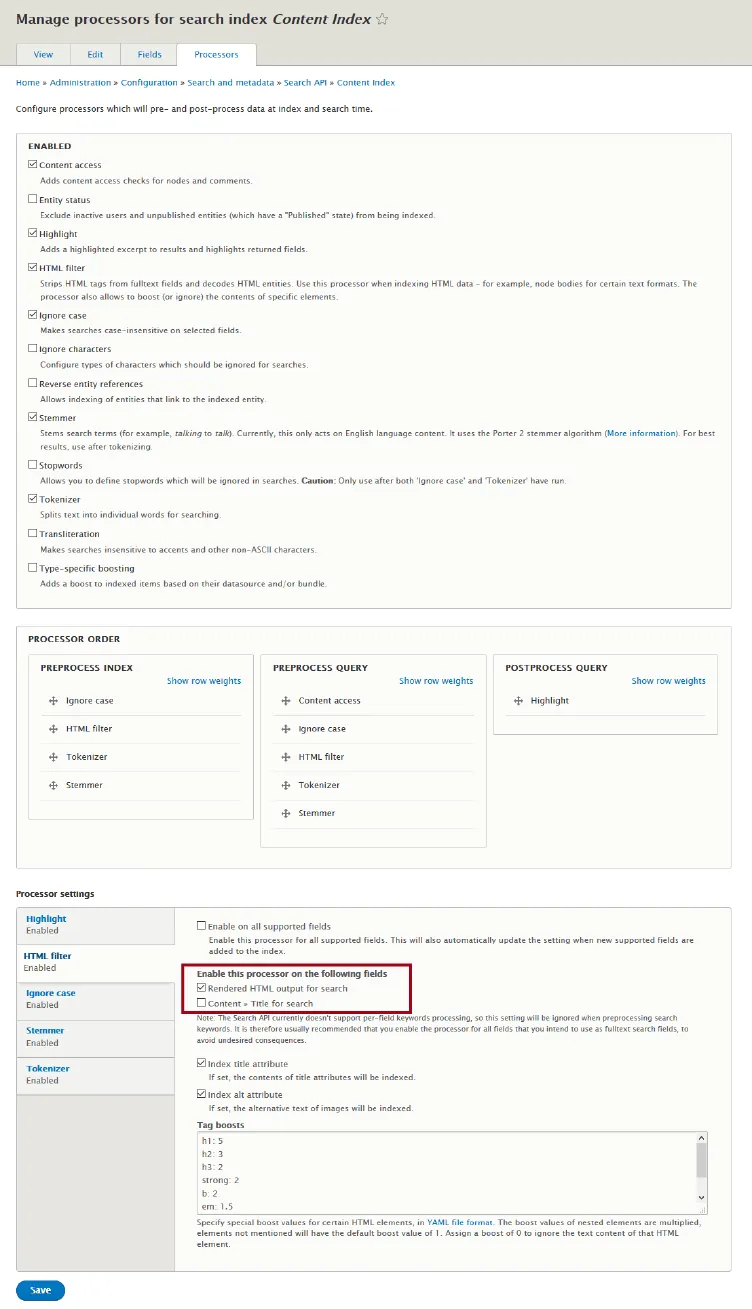
Save and Index the content.
Create a 'Search Result' View mode
We want a View mode to display the search results on the search page. We will use the Search API Views integration and create a View with a page to display search results.
Navigate to View modes administration and create a new Content View mode called Search Result:
/admin/structure/display-modes/view
Configure the Search Result Veiw mode for each content Entity bundle that is being indexed.
We will now create our search page view.
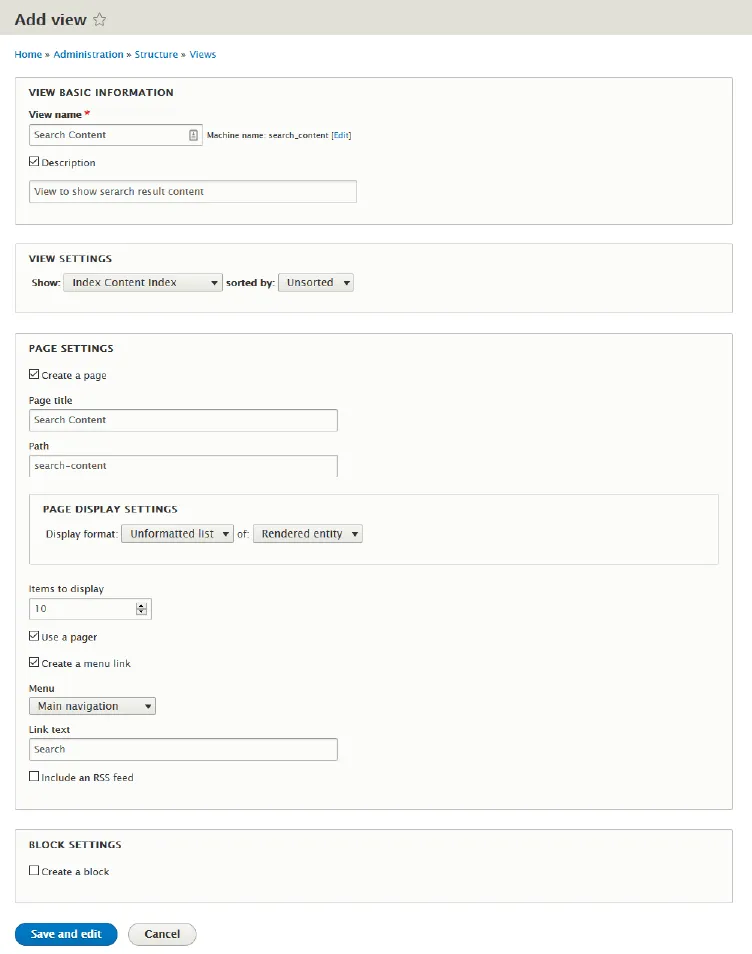
Create a View for the Search Page
Create a new View by navigating to the Views page and clicking +Add view.
/admin/structure/views

Create a new View with the following settings:
- View name and description - 'Search Content', View to show page of search results.
- View settings - Show 'Index Content Index' sorted by: 'Unsorted'.
- Create Page and 'Create a page' selected with Page settings of:
- Page title - Search Content;
- Path - search-content;
- Page Display Settings - Display format: 'Unformatted list' of: 'Rendered entity';
- Items to display - 10;
- Create a pager - selected;
- Create a menu link - selected with settings of:
- Menu - Main navigation;
- Link text - Search;
- Click
Save and edit .
Configure the view's Page Rendered entity Settings to use the 'Content Search Result' View mode and Apply and save the view.

Now in the View preview or by navigating to the View Path you will see a list of searched content as per the 'Content Search Result' View mode.
We will now configure FILTER CRITERIA and SORT CRITERIA for the search results.
Configure FILTER CRITERIA for Content Search (Expose search filters)
Earlier in this tutorial we added fields to our index for the purpose of searching. We will now add fields for the purpose of filtering. Navigate to the Search API administration page and then edit the Content index.
Navigate to the tab Fields and click +Add fields.
/admin/config/search/search-api
- Published;

You are taken back to the Manage Fields page with 'unsaved changes'. Under
- Published to Published for filtering. Leave Type Boolean.
Click Save changes. Go to View tab and re-index the content.
Navigate to the Content View to set up FILTER CRITERIA
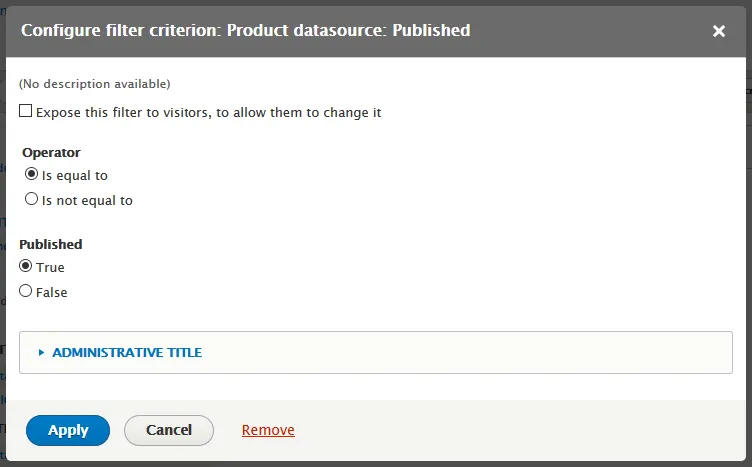
In the FILTER CRITERIA section click Add. Select and Apply (all displays) the Published for filtering and Fulltext search filter criterion.
Configure the filter criterion as follows:
- Published for sorting:
- Operator : Is equal to;
- Published : True;
- Fulltext search:
- Select 'Expose this filter to allow users to change it';
- Label: Search
- Operator: 'Contains any of these words';
- Filter identifier: 'filter';
- Placeholder: 'Enter your keywords';
- Under Selected fields you will see the fields that will be searched;
- Minimum keyword length: 3
- Leave the other settings at the default setting

Go to the Views's ADVANCED settings and change the 'Exposed form in block' setting from No to Yes. You do this by clicking 'No' and then selecting 'Yes'. This will add the search filter form to a block that can then be put on a page.
Save the view.
Navigate to the Block Layout administration screen and place the block appropriately.
/admin/structure/block
The name of the block will be something like:
Exposed form: search_content-page_1
Save the blocks Save blocks.
Navigate to your /search-content page and on refresh you should see the newly placed search filter block.
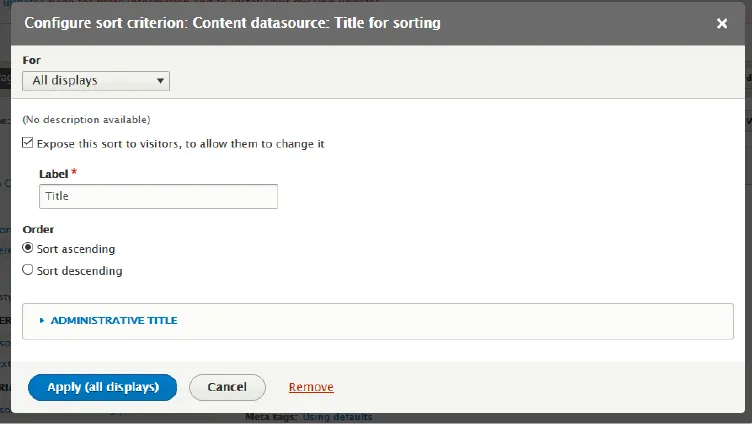
Configure SORT CRITERIA for Content Search
SORT CRITERIA follows a similar process to FILTER CRITERIA. Navigate to the Search API administration page and add the field Title to the index. Rename the Title label to Title for sorting and leave the Type as string. Once the changes have been saved, re-index from the View tab.
Navigate to the Content view and in the SORT CRITERIA section click Add.
Select the Title for sorting criterion and Apply (all displays). Configure the criterion as per the image below.

Under the ADVANCED settings there is now a Exposed form style Settings option. Here you can configure some settings for the form.
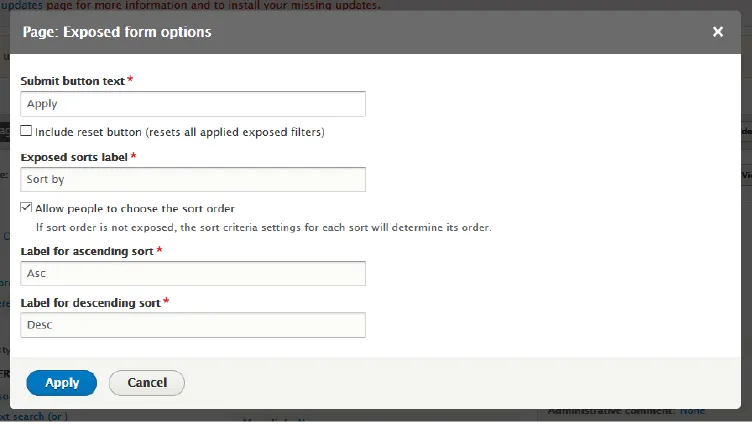
Save the view and navigate to the /search-content page, where you will now see the ability to sort.
We will now, finally, add search facets to our search page.
Add search facets
Search facets follow a similar process in that we first need to add a Taxonomy field which will filter our content based on category. This is then faceted search.
This implies that your content types that have been indexed for search have been categorised into a Taxonomy. The content type field would typically be an entity reference field referencing the content category taxonomy.
Navigate to the Search API administration page, edit the Index and add the Taxonomy entity reference field that categorises the content. Rename the Label to Category for facet and change the Type to String. Save changes and re-index the content from the View tab.
Click Save changes. Go to View tab and re-index the content.
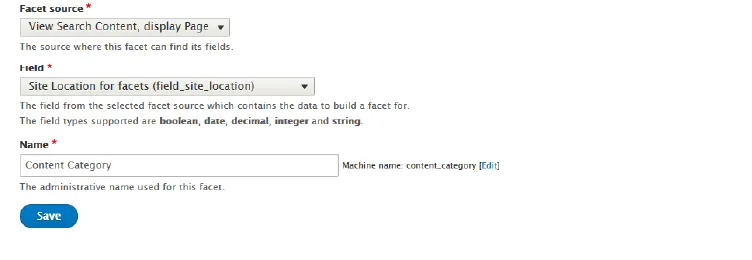
Navigate to the Facets administration page.
/admin/config/search/facets
You will see the facet source which is basically the search view.
search_api:views_page__search_content__page_1
Add a facet: click +Add facet. Select the Facet source, Facet field (Category for facets) and give the facet a name (Content category). Save.
Configure the facet to the following suggested settings:
- Widget:: List of checkboxes
- LIST OF CHECKBOXES SETTINGS:
- Check 'Show the amount of results';
- Check 'Show reset link';
- Check 'Hide reset link when no facet item is selected';
- Leave the rest at default settings.
- FACET SETTINGS:
- Check 'Transform entity ID to label';
- Check 'Use hierarchy';
- Leave the rest at default settings.
- FACET SORTING:
- Uncheck all except check 'Sort by taxonomy term weight'.
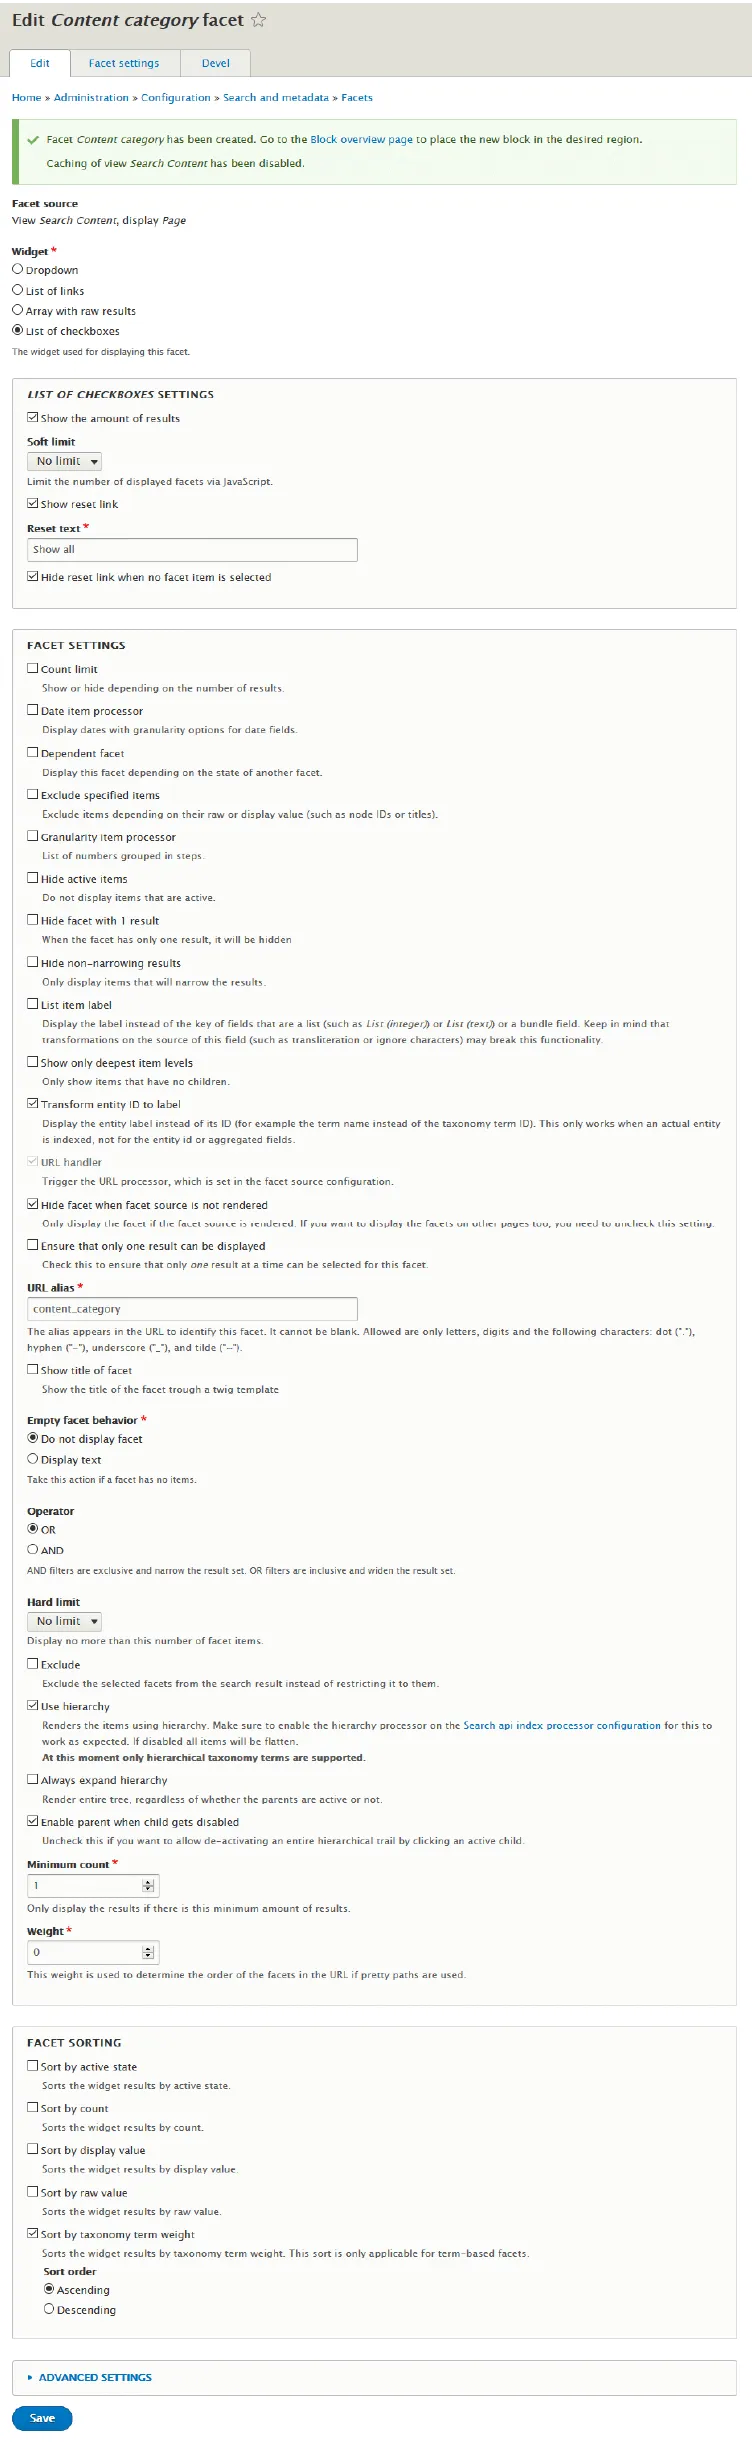
Save. This has now added the facet to a block. Navigate to the Block layout administration page and place the facet block below the search filter block we placed earlier. The block will be named Content category of the Facets block CATEGORY.

Save blocks and now on the /search-content page we will see the search facet Content Category.
Hire Me? Lets talk!
I am available for remote freelance work to select clients. Please contact me
My research
This article and the discovery of my Drupal 8 search process was aided by the following excellent contributions:
Comments
Great article! Really…
Great article! Really unraveled search facets in Drupal for me. :)
Thank you Lance
Thanks for the feedback, I am glad the article helped.
Great resource
Many thanks for this great article. Having watched many videos and other articles, none compare to the wealth of information here. A very good walk through setting everything up and creating the facets to use.
Thank you Jenifer
Wonderful to get this feedback.
Refresh number of items in facets
Hi thats a great guide! Well done!
I have a question:
When I am checking on filter of my facet, I want that the number of the other items are refreshing.
So if I have Item1, Item2 and Item3 and click on Item1. The website is refreshing and I get just the articles which include Item1.
I also just want to see in the facets how many of the filtered articles now include Item2 and Item3 and not the number of all articles.
Do you know what I mean? Can you help me with this?
Thanks,
Daniel
Custom Code
Hello Daniel, I do not think this can be done out of the box. It will probably require custom code.
Acquia DevDesktop
Thanks for your reply.
I am new at Drupal and using Acquia DevDesktop. Can you tell me how to customize my code to do that?
Custom Module
Right now, unfortunately not :-). You would need to build a custom module that hooks into and modifies the Facet module output. You should perhaps start by understanding how to build custom modules. Hope that helps.
Add new comment