
The challenge of any web development project is to manage environments. Development, staging and production environments. This tutorial explores Drupal 8 and Drupal 9 configuration management. We look at using configuration split, configuration ignores and configuration overrides. These tools allow us to create different configuration environments. These allow different config settings. This makes management between the environments easier.
The modules I have used
-
Config Ignore (config_ignore)
This module allows you to ignore certain configuration settings. This is useful to prevent certain configuration from being overwritten between development and production environments. For instance content blocks that may have placeholder content on Dev should not over write the live content. -
Configuration Split (config_split)
This module allows for different configuration settings between different site environments. For instance, in the development environment we typically use the Devel module. This module should not be enabled in the Production environment. -
Config Filter (config_filter)
Both Configuration Split and Config Ignore depend on the Config Filter module -
Chosen (chosen)
Chosen uses the Chosen jQuery plugin to make <select> elements more user fiendly. -
RobotsTxt (robotstxt)
Use this module when you are running multiple Drupal sites from a single code base (multisite) and you need a different robots.txt file for each one. This module generates the robots.txt file dynamically and gives you the chance to edit it, on a per-site basis, from the web UI. -
Environment Indicator (environment_indicator)
This module will help you to keep sane while working on your different environments by adding a configurable color bar to each one of your environments. The Environment Indicator adds a coloured bar on the site informing you which environment you're currently in (Development, Staging, Production, etc.). This is incredibly useful if you have multiple environments for each of your sites, and like me, are prone to forgetting which version of the site you are currently looking at.
Summary of steps
My configuration setup follows the following steps:
- Set up the Apache Server environment variable.
- Draw up a configuration planning matrix for the different environments.
- Configure the config ignores.
- Set up $_ENV detections and switch statement in settings.php.
- Create the spit directories.
- Creat the configuration split for the environments.
- Create configuration overrides.
Set up the Apache Server environment variable
This article is based on a website that uses Apache 2 web server on Ubuntu 16.04.4. Apache is configured for virtual hosts and in order to create environment variables for each virtual host we edit the
/etc/apache2/sites-available/[your.domain.co].conf file.
At the top of the <VirtualHost *:80> </VirtualHost> file we stet the environment variable with the following declaration:
  <VirtualHost *:80>
    SetEnv ENV_IDENTIFIER name_of_identifier
    # The ServerName directive sets the request scheme, hostname and port that
    # the server uses to identify itself. This is used when creating
    .......
    .....
  </VirtualHost>
Then in the Drupal 8 settings.php file we can read the Apache environment variable ENV_IDENTIFIER with the following code:
  getenv('ENV_IDENTIFIER') ? $drupal_environment = getenv("ENV_IDENTIFIER") :
  $drupal_environment = 'development';
Draw up a configuration planning matrix for the different environments.
It is a good idea to understand beforehand what the different configuration environments will look like. To this end I create a spreadsheet which maps out the different scenarios across dev, staging and production.
The graphic below indicates the configuration planning for this site.
Please Note: For Drupal 9, Devel Kint is no longer included in the Devel module. The module Devel Kint Extras will bring back Kint functionality.

What Configuration Ignore does
Configuration Ignore ignores certain configuration settings when we import the configuration. So we do not want drush config:import to modify specific configurations. We can be very specific or use wildcard.
  block.block.bannerblockname - will ignore just this contnet block
  block.block.* - will ignore all blocks
Using Config Ignore, will export the configuration but not import it.
NOTE: we should never ignore core.extension or config.ignore
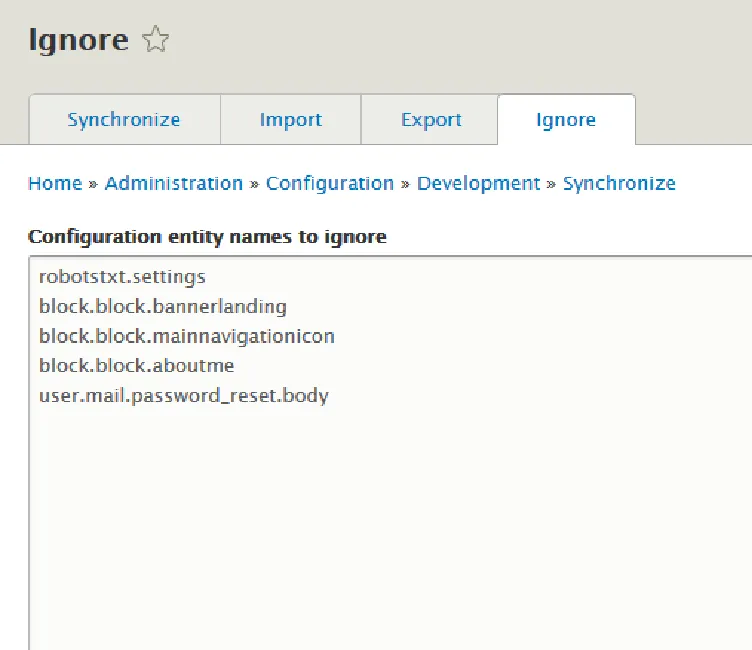
Below shows the Config Ignore settings for this site:
  robotstxt.settings
  block.block.bannerlanding
  block.block.mainnavigationicon
  block.block.aboutme
  user.mail.password_reset.body
The blocks ignored are instances of content blocks. Blocks used for content should be ignored in order to avoid the content being overridden on the production site.
The RobotsTxt module is used and via settings.php we force the value for Dev and Staging to be:
Disallow: /
For Production the robots.txt file is authorable via:
/admin/config/search/robotstxt
What Configuration Split does
We use Config Split when we have different configurations in one or more environments and we want to manage the site via config.
Config Split stores the stores the config yml files of the spit in a different directory to the main synch directory. This happens on the command:
drush config-split:export
A spit can be active or inactive and is set to be active or inactive in the settings.php file. If the spit is set to active then the configuration stored in the config split directory will be imported on:
drush config:import
We leverage the $_ENV variable within the settings.php file to set splits as active or inactive.
There are two kinds of splits; complete and conditional. Complete split will split the complete configuration into its own directory. For instance the Devel module is enabled on Dev but not on Staging and Production. For this a complete split is used.
Conditional split is used when the module is enabled across all environments however there are different settings per environment. An example is Error/Notice display settings. This is set to full on Dev and hidden on Production.
What Configuration Overrides do
Configuration overrides are configuration values that are set in settings.php and will persist no matter what. These are settings that do not change often and you want to make sure the value does not get changed. Examples here are API keys such as the Google Analytics key or which split should be active.
  $config['google_tag.settings.container_id'] = "UA-########-3";
  $config['config_split.config_split.staging_split']['status'] = TRUE;
The steps to setting up configuration management
Configure the config ignores
Enable the Config Filter and Config Ignore modules. Navigate to:
/admin/config/development/configuration/ignore
(a tab on the Configuration synchronization pages) and enter the settings to ignore.
Set up $_ENV detections and switch statement in settings.php
Earlier in this article we used SetEnv in the Apache VirtualHost file to set an environment indicator. We use the code below to detect the enviromnent:
  getenv('ENV_IDENTIFIER') ? $drupal_environment = getenv("ENV_IDENTIFIER") :
  $drupal_environment = 'development';
In settings.php we use the above information in a switch statement to set environment specific settings.
  switch ($drupal_environment) {
    case 'dev':
      //dev specific settings
      break;
    case 'staging':
      //staging specific settings
      break;
    case 'production':
      //production specific settings
      break;
    default:
      //default settings
  }
Create the split directories
We can now create the split directories. These should be siblings of the main config directory and must be made before exporting the split. On exporting the split the .htaccess file preventing public browsing is created but not the directory itself.
  pm_user@dev1:$ cd path/config
  pm_user@dev1:/config$ mkdir environments/dev environments/staging environments/prod
Creat the configuration split for the environments
We are now ready to create the configuration splits for the environments.
I follow the following process:
- Ensure that the Configuration Split (config_split) and Chosen (chosen) modules are enabled.
- On the development server simulate the environment (dev, staging, production) that you want to create the split for and import the configuration in the sync directory.
drush config:import drush cr - Enable / Disable modules and settings that are required for the current environment.
- Create the split at:
/admin/config/development/configuration/config-split
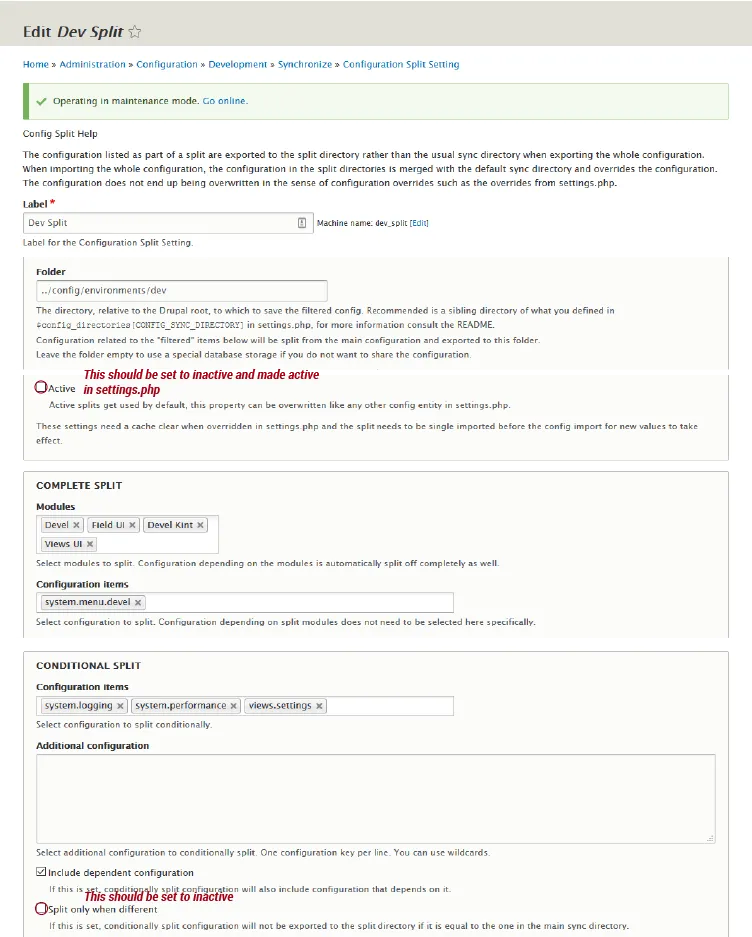
- Export the split to the split directory:
drush config-split:export split_machine_name - Export the Config Split settings
drush config:export - Commit the export
      git add [be careful what is added]
      git commit -m 'commit messange'
The settings.php code
Below is the code in the settings.php file for this site:
  switch ($drupal_env) {
  case 'dev':
    // Environment indicator
    $config['environment_indicator.indicator']['bg_color'] = 'green';
    $config['environment_indicator.indicator']['fg_color'] = '#ebeef4';
    $config['environment_indicator.indicator']['name'] = 'Dev';
    // Config Split
    $config['config_split.config_split.dev_split']['status'] = TRUE;
    // robots.txt
    $config['robotstxt.settings']['content'] = "User-agent: *\nDisallow: /\n";
    break;
  case 'staging':
    // Environment indicator
    $config['environment_indicator.indicator']['bg_color'] = 'yellow';
    $config['environment_indicator.indicator']['fg_color'] = 'black';
    $config['environment_indicator.indicator']['name'] = 'Staging';
    // Config Split
    $config['config_split.config_split.staging_split']['status'] = TRUE;
    // robots.txt
    $config['robotstxt.settings']['content'] = "User-agent: *\nDisallow: /\n";
    break;
  case 'production':
    // Environment indicator
    $config['environment_indicator.indicator']['bg_color'] = 'red';
    $config['environment_indicator.indicator']['fg_color'] = 'white';
    $config['environment_indicator.indicator']['name'] = 'Production';
    // Config Split
    $config['config_split.config_split.production_split']['status'] = TRUE;
    // robots.txt
    // Set via the UI
    //  Google tag id
    $config['google_tag.settings.container_id'] = "UA-xxxxxxxx-x";
    break;
  default:
    $config['config_split.config_split.dev_split']['status'] = TRUE;
}
Tips
- Explore the yml file structure to identify the string to use in the various configuration settings.
This Tutorial's Video on You Tube
Watch a video of this tutorial.
My research
This article and the discovery of my Drupal 8 configuration management process was aided by the following excellent contributions:
Add new comment